MySQL catalogs #
You can use a MySQL catalog to configure access to a MySQL or compatible database in the following deployments:
Amazon RDS on Amazon Web Services:
- Amazon Aurora, MySQL-compatible edition
- Amazon RDS for MySQL
Azure Database on Microsoft Azure:
Cloud SQL on Google Cloud:
Follow these steps to create a catalog for MySQL:
- In the navigation menu, select Data, then Catalogs.
- Click Create catalog.
- On the Create a catalog pane, click the MySQL icon.

- Configure the catalog as prompted in the dialog.
- Test the connection.
- Connect the catalog.
- Set any required permissions.
- Add the new catalog to a cluster.
The following sections provide more detail for creating MySQL catalog connections.
Select a cloud provider #
The Cloud provider configuration is necessary to allow Starburst Galaxy to correctly match catalogs and clusters.
The data source configured in a catalog, and the cluster must operate in the same cloud provider and region for performance and cost reasons.

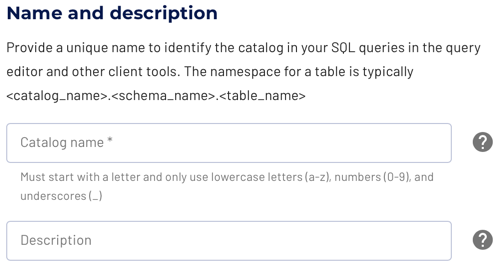
Define catalog name and description #
The Catalog name is visible in the query editor and other clients. It is used to identify the catalog when writing SQL or showing the catalog and its nested schemas and tables in client applications.
The name is displayed in the query editor, and in the output of a SHOW
CATALOGS command.
It is used to fully qualify the name of any table in SQL queries following the
catalogname.schemaname.tablename syntax. For example, you can run the
following query in the sample cluster without first setting the catalog or
schema context: SELECT * FROM tpch.sf1.nation;.
The Description is a short, optional paragraph that provides further details about the catalog. It appears in the Starburst Galaxy user interface and can help other users determine what data can be accessed with the catalog.
Multiple connections #
The MySQL catalog can only access a single MySQL database within a single catalog. If you have multiple MySQL databases, or want to connect to multiple MySQL instances, you must configure additional instances of the MySQL catalog.
Configure the connection #
Read further to learn about each supported connection method. The following sections detail the setup for the supported cloud providers.
-
Connect directly
The connection to the database requires a username, password authentication, and the details necessary to connect to the database server, typically hostname or IP address and port. -
Connect via SSH tunnel
A connection to the database can be established directly, if the Starburst Galaxy IP range/CIDR is allowed to connect.If the database is only accessible inside the virtual private cloud (VPC) of the cloud provider, you can use an SSH tunnel with a bastion host in the VPC.
-
PrivateLink Starburst Galaxy supports AWS PrivateLink for MySQL catalogs.
Amazon RDS configuration #
To configure the connection to your database on Amazon RDS you must provide the following details:
- RDS database host: use the fully qualified domain name for the server
available as Endpoint in the Amazon RDS console under Connectivity &
security. Typically
dbidentifier.random.regionname.rds.amazonaws.com. - RDS database port: port of the server available with endpoint. Typically
3306 for MySQL. The port is configurable for your
database in the Amazon RDS console under Connectivity - Database port.
- RDS database username: specify a username that has the permissions to perform the desired task.
- RDS database password: specify the password for the database username.
The database on Amazon RDS needs to fulfill the following requirements:
- Configured for Public access, available in the Amazon RDS console for your database in Connectivity - Additional configuration
- VPC security group configured to allow Starburst Galaxy access. The specific IP address range/CIDR is dependent on your AWS region, and displayed after a Test connection execution. Add it as an inbound rule to allow the range.
- Database authentication set to Password authentication.
Azure Database configuration #
The database on Azure Database needs to fulfill the following requirements:
- DB server host: use the fully qualified domain name for the server available as Server name in Essentials, as well as the Connections strings in the Azure Database console.
- DB server port: port of the server available with endpoint. Typically 3306 for MySQL.
- DB server admin login name: use the Admin username of the Administrator account.
- DB server admin password: use the password for the user.
The database on Cloud SQL needs to fulfill the following requirements from the Connection security section of the Settings for the database:
- A firewall rule configured for the Starburst Galaxy IP address range with Start IP and End IP configured with a random Firewall rule name.
- TLS setting configured for the Minimum TLS version as 1.2
Google Cloud configuration #
Configure the database on Google Cloud SQL by filling in the following required fields:
- Database IP address: use the IP address for the server available as Public IP address in the Cloud SQL console under Connect to this instance.
- Database port: port of the server available with endpoint. Typically 3306 for MySQL.
- Username: use a configured user with sufficient access.
- Password: use the password for the user.
The database on Google Cloud SQL must fulfill the following requirements:
- Configured for Public IP, available in the Cloud SQL console for your database in Connections - Public IP with an Authorized network configured with the CIDR to allow Starburst Galaxy access. The specific IP address range/CIDR is dependent on your Google Cloud region, and displayed after a Test connection execution.
- Zonal availability set to Single zone.
- User configured with username and password in Users.
Test the connection #
Once you have configured the connection details, click Test connection to confirm data access is working. If the test is successful, you can save the catalog.
If the test fails, look over your entries in the configuration fields, correct any errors, and try again. If the test continues to fail, Galaxy provides diagnostic information that you can use to fix the data source configuration in the cloud provider system.
Connect catalog #
Click Connect catalog, and proceed to set permissions where you can grant access to certain roles.
Set permissions #
This optional step allows you to configure read-only access or full read and write access to the catalog.
Use the following steps to assign read-only access to all roles:
- Select the Read-only catalog switch to grant a set of roles read-only access to the catalog’s schemas, tables, and views.
- Next, use the drop-down menu in the Role-level permissions section to specify the roles that have read-only access.
- Click Save access controls.
You can specify read-only access and read-write access separately for different sets of roles. That is, one set of roles can get full read and write access to all schemas, tables, and views in the catalog, while another set of roles gets read-only access.
Use the following steps to assign read/write access to some or all roles:
- Leave the Read-only catalog switch cleared.
- In the Role-level permissions section:
- Expand the drop-down menu in the Roles with read and write access field and select one or more roles to grant read and write access to.
- Expand the drop-down menu in the Roles with read access field and select one or more roles from the list to grant read-only access to.
- Click Save access controls.

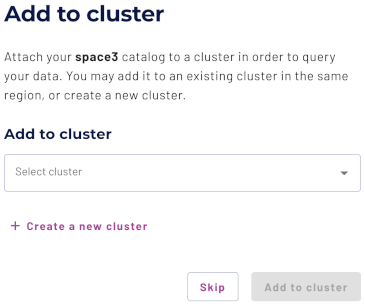
Add to cluster #
You can add your catalog to a cluster later by editing a cluster. Click Skip to proceed to the catalogs page.
Use the following steps to add your catalog to an existing cluster or create a new cluster in the same cloud region:
- In the Add to cluster section, expand the menu in the Select cluster field.
- Select one or more existing clusters from the drop down menu.
- Click Create a new cluster to create a new cluster in the same region, and add it to the cluster selection menu.
-
Click Add to cluster to view your new catalog’s configuration.
SQL support #
The catalog provides read access and write access to data and metadata in the MySQL database. It supports the following features:
- Globally available statements
- Read operations
- Write operations:
- Data Management:
- Schema and table management:
The following sections provide MySQL catalog-specific information regarding SQL support.
Data management details #
If a WHERE clause is specified, the DELETE operation only works if the
predicate in the clause can be fully pushed down to the data source.
Session properties #
The following table describes the session properties supported by the MySQL catalog.
| Session property | Description |
|---|---|
aggregation_pushdown_enabled |
Enable aggregation pushdown. The default value is true
(boolean). |
complex_join_pushdown_enabled |
Enable join pushdown with non-comparison expressions. The default
value is true (boolean). |
decimal_default_scale |
Default decimal scale for mapping unspecified and exceeding precision
decimals. Not used when decimal_mapping is set to STRICT.
The default value is 0 (integer). |
decimal_mapping |
Decimal mapping for unspecified and exceeding precision decimals.
STRICT skips them; ALLOW_OVERFLOW requires setting proper
decimal scale and rounding mode. Possible values:
STRICT.
|
decimal_rounding_mode |
Rounding mode for mapping unspecified and exceeding precision decimals.
Not used when decimal_mapping is set to STRICT.
Possible values:
UNNECESSARY.
|
domain_compaction_threshold |
Maximum ranges to allow in a tuple domain without simplifying it.
The default value is 256 (integer). |
dynamic_filtering_enabled |
Wait for dynamic filters before starting JDBC query. The default
value is true (boolean). |
dynamic_filtering_wait_timeout |
Duration to wait for completion of dynamic filters. The default
value is 1.00s. |
join_pushdown_automatic_max_join_to_tables_ratio |
If estimated join output size is greater than or equal to ratio * sum
of table sizes, then join pushdown will not be performed.
The default value is 1.25 (double). |
join_pushdown_automatic_max_table_size |
Maximum table size to be considered for join pushdown. The default value is empty. |
join_pushdown_enabled |
Enable join pushdown. The default value is
true (boolean). |
join_pushdown_strategy |
Join pushdown strategy. Possible values:
AUTOMATIC.
|
non_transactional_insert |
Enables support for non-transactional INSERT. The default value
is false (boolean). |
non_transactional_merge |
Enables support for non-transactional MERGE. The default value
is false (boolean). |
topn_pushdown_enabled |
Enable TopN pushdown. The default value is
true (boolean). |
unestimatable_dynamic_filtering_wait_timeout |
Duration to wait for completion of dynamic filters with unestimatable
build side. The default value is 20.00s. |
unsupported_type_handling |
Unsupported type handling strategy. Possible values:
IGNORE.
|
write_batch_size |
Maximum number of rows to write in a single batch.
The default value is 1000 (integer). |
write_parallelism |
Maximum number of parallel write tasks.
The default value is 8 (integer). |
Is the information on this page helpful?
Yes
No